Meta (Facebook/Instagram) Ads — Setup Guide
For: Anyone who needs to set up Meta Ads from scratch. Assumes: Zero marketing/technical background. Time: ~30 min setup + 2–7 days for business verification.
What You'll Set Up
| # | What | Why |
|---|---|---|
| 1 | Facebook Account | Required to access any Meta business tool |
| 2 | Meta Business Portfolio | Your company's central control panel |
| 3 | Facebook Page | All ads run "from" a Page — users see it on your ads |
| 4 | Ad Account + Billing | Where your campaigns, budgets, and payments live |
| 5 | Business Verification | Unlocks full features and removes spending limits |
| 6 | Instagram Account | Run ads on Instagram with your brand identity |
| 7 | Meta Pixel (Dataset) | Track website visitor actions for ad optimization |
Step 1: Create a Facebook Account
Skip if you already have a personal Facebook account.
- Go to https://www.facebook.com
- Click Create new account
- Fill in: name, email/phone, password, birthday, gender
- Verify your email or phone number
Why? A personal Facebook account is the gateway to all Meta business tools. You cannot skip this.
Step 2: Create a Meta Business Portfolio
What is this? Your company's main dashboard on Meta. It holds all your ad accounts, Pages, pixels, and team members in one place. Previously called "Business Manager."
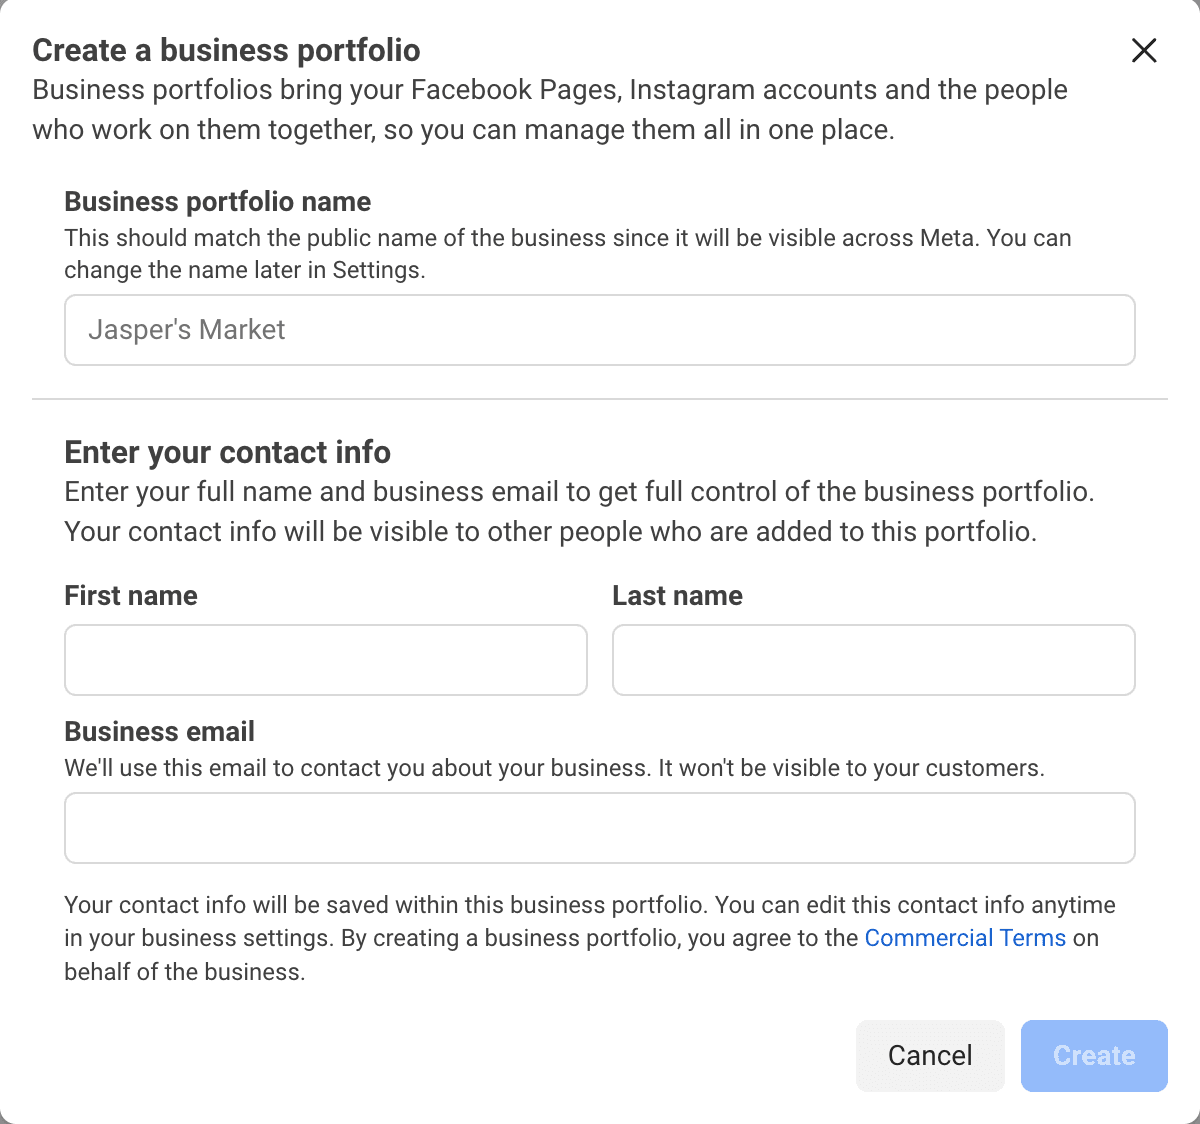
- Go to https://business.facebook.com/overview
- Click Create Account (or "Create a Business Portfolio")
- Fill in:
- Business name: Your company's legal name (e.g., "Acme Corp")
- Your name: Your personal name
- Business email: A company email (e.g., hello@acme.com)
- Click Submit
- Check your email → click the confirmation link
Limits:
- 1 person can create up to 2 Business Portfolios
- Each portfolio starts with up to 25 ad accounts (increases with spend)
Step 3: Create a Facebook Page
What is this? A Facebook Page represents your business publicly. Ads are shown "from" your Page — users see the Page name and profile photo on every ad.
Skip if you already have a Page for your business.
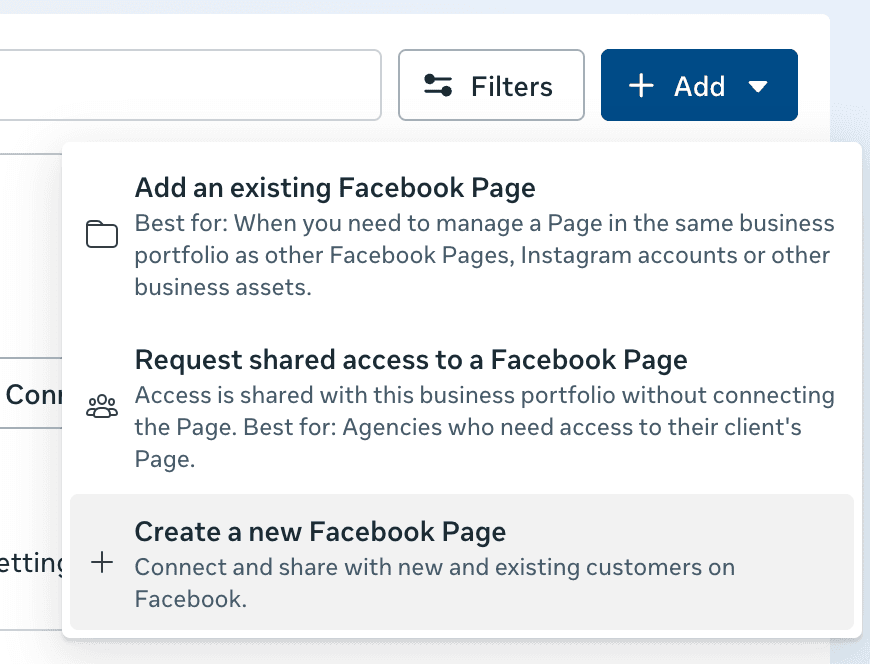
- In Business Portfolio → Accounts → Pages
- Click Add → Create a New Page
- Fill in:
- Page name: Your business or brand name
- Category: Choose the closest match (e.g., "E-commerce Website", "Marketing Agency")
- Bio (Optional): Write about what your business does, the services you provide, or the purpose of the Page.
- Upload a profile photo (your logo) and cover photo
- Click Create Page
Why is this required? Meta doesn't let you run ads without a Page. Every ad shows your Page name and icon.
Step 4: Create an Ad Account + Set Up Billing
What is this? The ad account is where your campaigns, budgets, and billing live. Think of it as your "wallet" for advertising.
Skip if you already have an ad account.
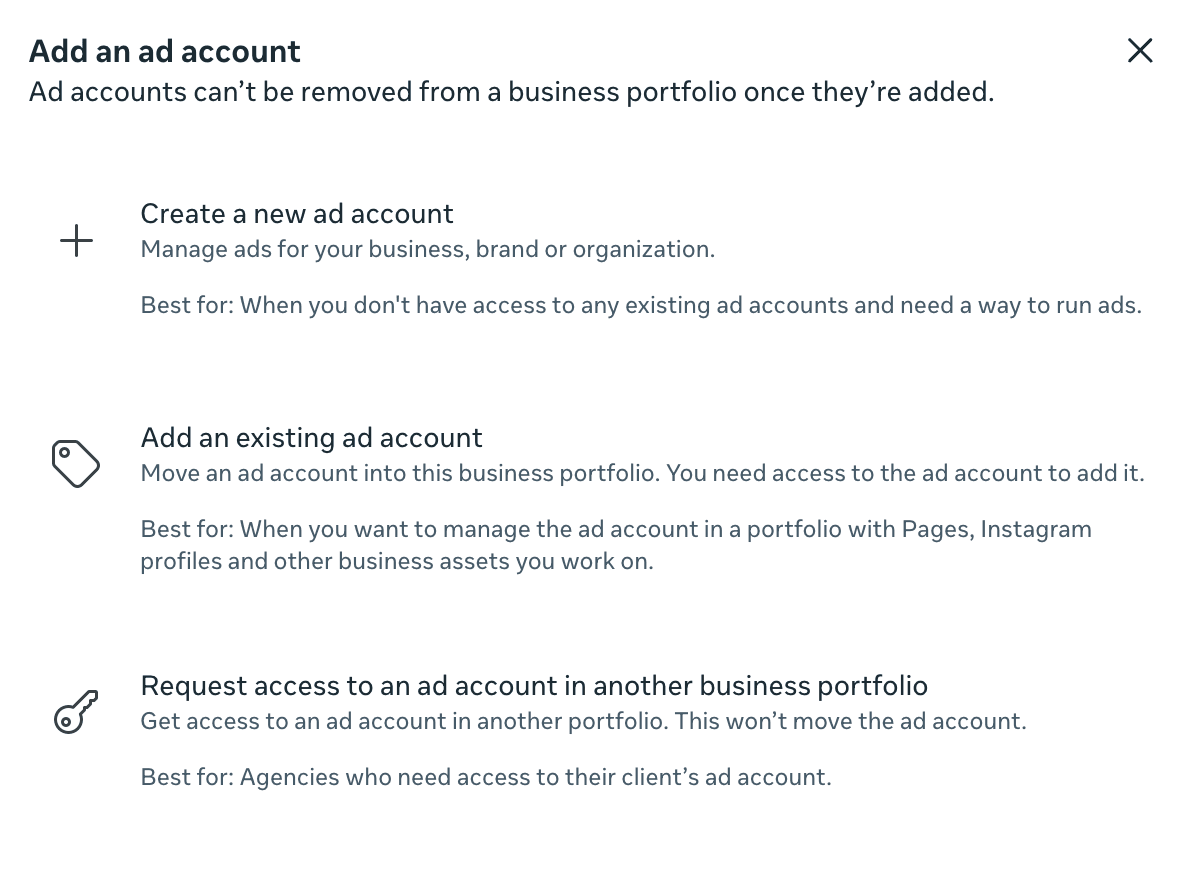
Create the Account
- In Business Portfolio → Accounts → Ad Accounts
- Click Add → Create a New Ad Account
- Fill in:
- Ad account name: Any descriptive name (e.g., "Acme Main Ad Account")
- Time zone: Your local time zone
- Currency: Your preferred currency
⚠️ Time zone and currency CANNOT be changed after creation. Choose carefully.
- Click Create
Add a Payment Method
- Go to Payment Settings (in the ad account, or Business Portfolio → Billing)
- Click Add Payment Method
- Choose one:
- Credit card / Debit card
- PayPal
- Bank transfer (availability varies by country)
- Enter payment details → Confirm
Without a payment method, you cannot run ads. But you can still connect the account for data syncing purposes.
Step 5: Business Verification
What is this? Meta verifies that your business is a real, legitimate entity. This is important because:
- Unlocks full API access
- Removes or raises spending limits
- Required for advanced permissions (ads management via third-party tools)
- Gives your business a verified badge in Business Portfolio
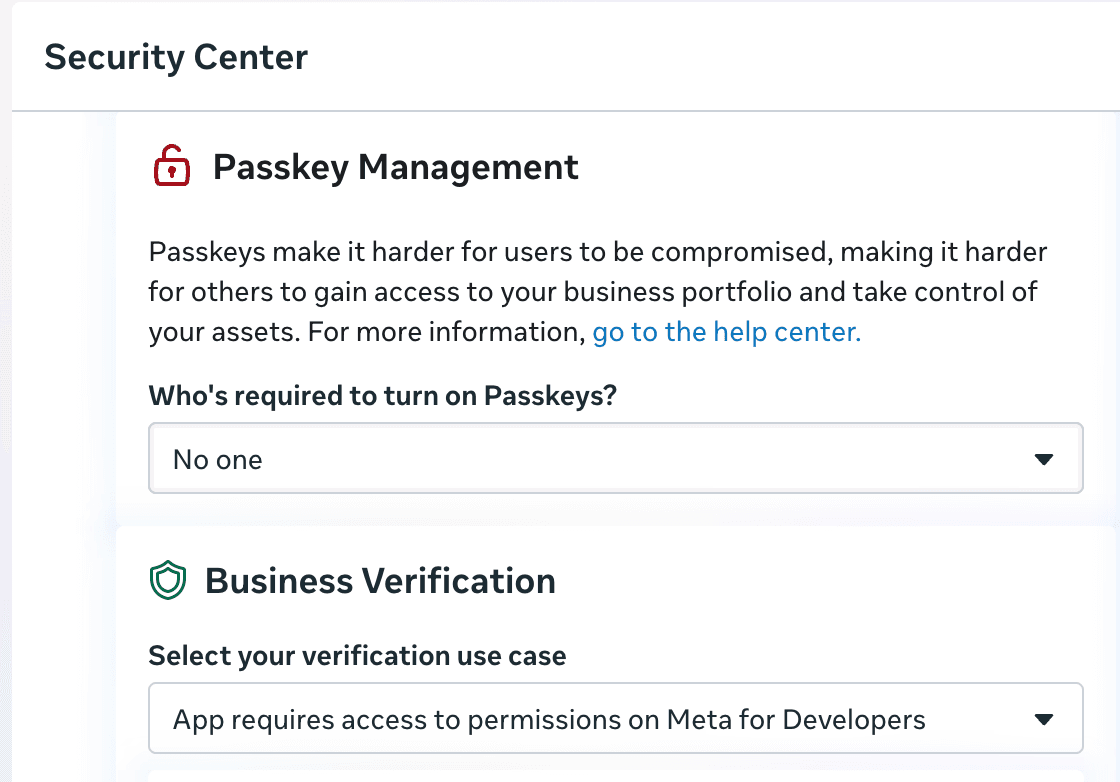
How to Verify
- Go to Business Settings → Security Center (in your Business Portfolio)
- Click Start Verification
- Provide:
- Legal business name — must exactly match your official documents
- Business address — as registered with the government
- Business phone number — Meta may call this number to verify
- Business website URL
- Tax ID / EIN / Business registration number
- Upload two supporting documents from different categories:
| Category | Accepted Documents |
|---|---|
| Business identity | Business registration certificate, Articles of incorporation |
| Business address | Utility bill (within 3 months), Bank statement, Tax filing |
| Business phone | Phone bill (within 3 months) |
- Click Submit
- Wait 2–7 business days
- Meta may call your phone number for additional verification
- You'll get an email when approved (or if they need more info)
Tips for Smooth Verification
- Business name must match exactly between your documents and what you entered (including punctuation, "Inc.", "LLC", etc.)
- If Meta calls your phone and you miss it, they may reject — be ready to answer
- If rejected, you can resubmit with corrected information (no limit on retries)
Step 6: Connect Instagram Account (Optional but Recommended)
Why? If you want to run ads on Instagram, you need to connect an Instagram account to your Business Portfolio. Without this, your Instagram ads will show your Facebook Page name instead.
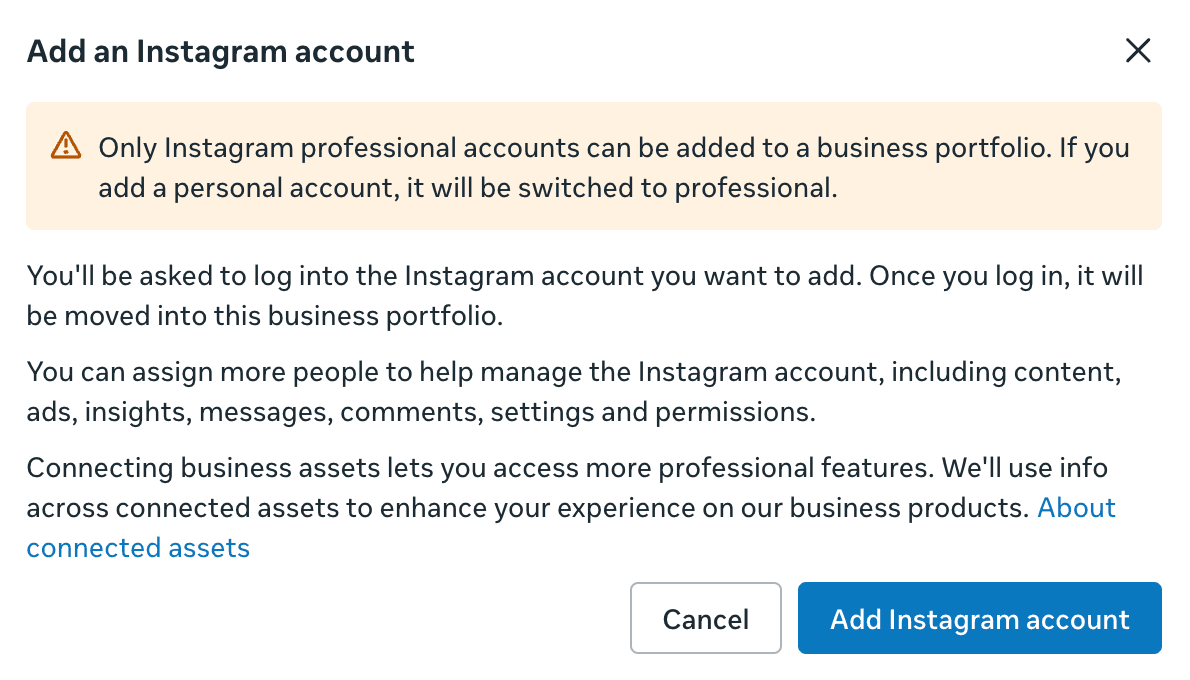
- In Business Portfolio → Accounts → Instagram Accounts
- Click Add → Connect an Instagram Account
- Log in with your Instagram credentials
- Confirm the connection
If you don't have an Instagram business account yet, convert your personal account: Instagram → Settings → Account → Switch to Professional Account → Business.
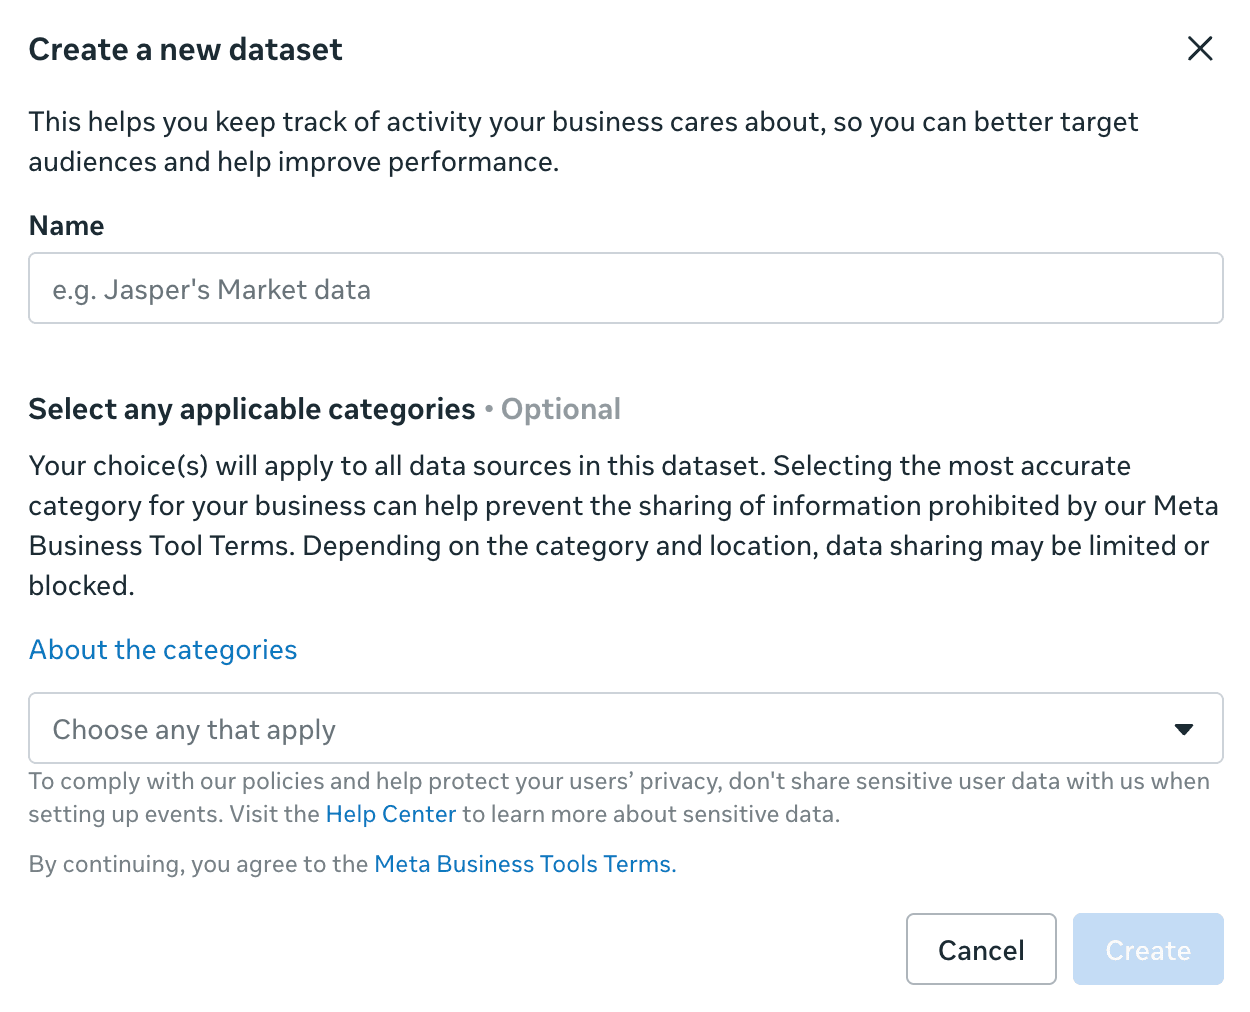
Step 7: Set Up Meta Pixel (Dataset)
What is this? The Meta Pixel is a piece of JavaScript code on your website that tracks visitor actions (page views, purchases, sign-ups, etc.). Meta now manages Pixels inside Datasets — a unified container that combines browser events (Pixel) and server-side events (Conversions API) in one place. The Dataset ID is the same as your Pixel ID.
Create a Pixel
- Go to Events Manager → https://business.facebook.com/events_manager
- Click Connect Data → select Web → click Connect
- Enter a name for your pixel (e.g., "Acme Website Pixel")
- Click Create Pixel
- Save your Pixel ID — you'll need it for installation
Install on Your Website
Meta offers several installation methods:
| Method | Best For |
|---|---|
| Partner Integration | Shopify, WordPress, Webflow, Wix — easiest, no code needed |
| Manual Installation | Custom websites — paste the base code in your <head> tag |
| Google Tag Manager | Sites already using GTM for tag management |
For manual installation, paste the provided code snippet between the <head> tags on every page of your website.
Set Up Events
- In Events Manager, open your Dataset and click Add Events
- Enter your website URL — Meta will scan and suggest common events
- Review each suggestion and click Confirm or Dismiss
- For custom events, navigate your site and select Track new button or Track a URL
Common events to track:
| Event | When to Use |
|---|---|
| PageView | Automatically tracked on every page load |
| Purchase | E-commerce order completion |
| Lead | Form submissions, sign-ups |
| AddToCart | Product added to shopping cart |
| ViewContent | Product or content page views |
Test Your Setup
- In Events Manager, open your Dataset → click Test Events
- Enter your website URL and open your site in a new tab
- Perform actions on your site (browse pages, submit forms, etc.)
- Events should appear in real time in the Test Events panel
- Once events show Active status, your tracking is ready
Tip: Install the Meta Pixel Helper Chrome extension to diagnose issues directly on your site.
Summary
Must-Have (Required to Run Ads)
- Personal Facebook account
- Meta Business Portfolio created at business.facebook.com
- Facebook Page created for your business
- Ad Account created with time zone and currency set
- Payment method added to ad account
Strongly Recommended
- Business Verification completed (2–7 days)
Recommended for Ad Performance
- Meta Pixel installed on your website
- At least 1 conversion event set up (e.g., Purchase or Lead)
- Conversions API configured for server-side tracking
Key URLs
| What | URL |
|---|---|
| https://www.facebook.com | |
| Business Portfolio | https://business.facebook.com |
| Events Manager (Pixels) | https://business.facebook.com/events_manager |
| Meta Business Help | https://www.facebook.com/business/help |